My husband, Travis, and I got married on March 8, 2014. As we were planning our wedding we realized that we didn’t want to start our life together in debt. So, with our DIY attitudes and a love for adventure, we put together a wedding ceremony and reception that was personal, beautiful, and fun, on a $10,000 budget.
Now, you might think $10,000 is a lot to spend on a wedding, or maybe you think it is too little. I know couples who have planned a wedding with a budget as high as $100,000 and as low as $2,500. My advice to you is choose a budget that you and your partner are comfortable with spending.

My tips and tricks in this post will help you begin to plan your wedding and teach you some ways you can save money. To start, check out these three important decisions you need to make:
- Choose a theme that reflects the personality of you and your fiance. It’s okay to have more than one theme, but make sure the themes compliment each other. We had a travel, vintage, country theme because traveling is a mutual hobby of ours and we knew we could use a lot of the items we already owned as decorations for the wedding.
- Choose three elements that you must have at your wedding. These should be the three most important elements that you want at your wedding. For us that was a DJ, a photographer, and an ice cream bar (because whoever doesn’t love cake most likely loves ice cream – am I right?)
- Choose a venue that will help you save on decorations or other wedding elements. When visiting potential venues, make sure to ask for all that is included. Many venues at a resort or hotel include centerpieces, linens, and the cake. Even if you are lucky to find a free venue, make sure to find out what your caterer will offer.

Now that you have made these three important choices and identified the budget boundaries for your wedding, the next step is to reach out to your network of friends who can help with the services.
Do you have an old high school friend who is working on a degree in videography? A friend of a friend who does DJ work on the side and can offer you a huge discount? Or, a previous coworker who owns a photography business? You’ll be surprised of all the connections you can find in your network. We happened to have all three of those connections who offered discounts which meant we saved a bundle!
If you find out that you don’t have the connections you’re looking for … no worries! Check out all the gig opportunities posted on community sites like Craigslist, or the bulletin boards at your local college for students looking to get experience to build their professional portfolios. Maybe you will luck out and get the services for free.

After you have your venue and services secure, you can begin thinking about decorations. This part is fun! Think about all the decorations you would like to have at your wedding and separate your ideas into three categories:
- Decorations you can make yourself
- Decorations you will order
- Decorations you already have or can borrow
Here on this blog I will post DIY projects, but you can also search the internet for inspiration or how-to videos. You will find that Pinterest and the dollar stores will become your best friend, as they are mine. Not only will DIY decorations save you dollars, but they will give a personal touch to your event which will make your wedding a memorable party for you and your guests.
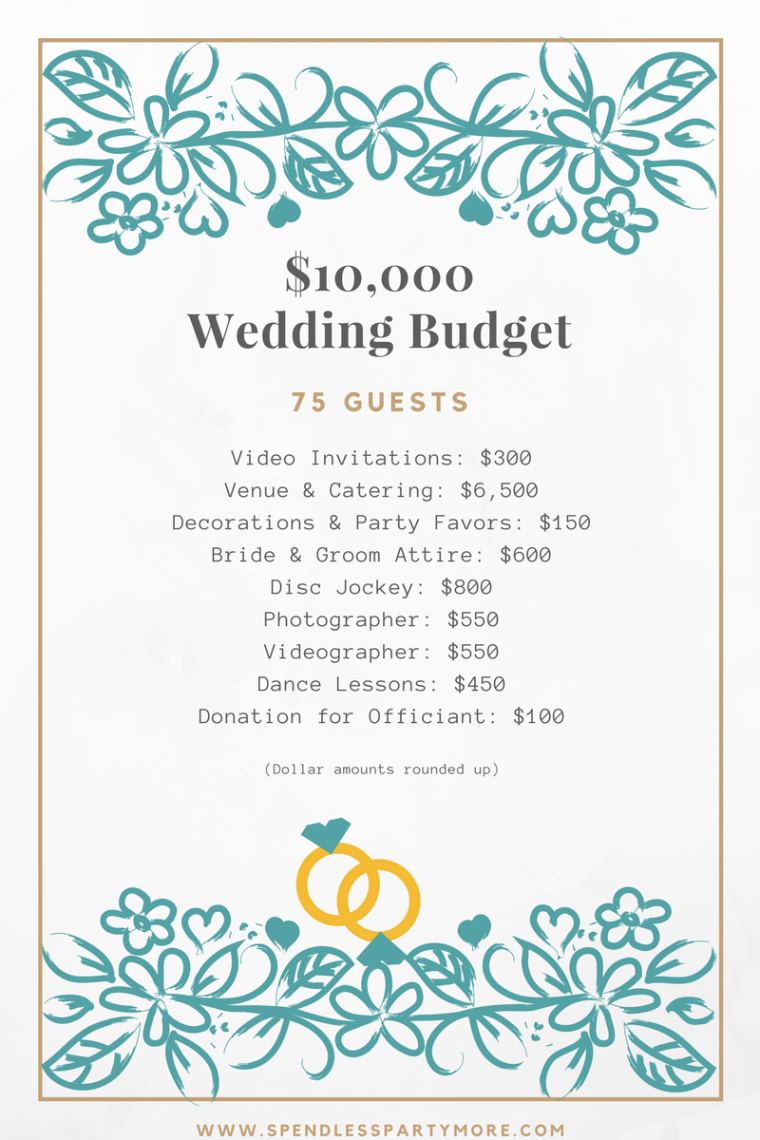
Finally, the part you have been scrolling for … how did we spend $10,000 on our wedding.
Check out this HIGHLIGHTS VIDEO of our wedding and our budget details below.
Note: The budget I show does not include our wedding rings or honeymoon cost.
 There is a lot involved with planning a wedding, so I am sure you are feeling a bit overwhelmed. I would love to answer your questions or give you more advice, so please feel free to comment below or send me a message.
Happy savings … and remember to have fun!

(Photos in this post were taken by Blessed Images Photography)
